Global automated reports is a feature within the software that allows you to run reports for all of your companies at the same time.
You will be able to choose a report like a payslip and produce payslips for all of your employees across all of your companies.
The Configure and Process screens can be accessed in the Manager and Bureau products from the "Reports > Pay Period > Automated Reports 2.0" menu options, the changes made in here will only effect one company.
Configure Reports
You can set up which reports are run for Global Automated Reports from “Reports > Global Reports > Automated Reports > Configure Reports”. The menu below is what will be displayed. You will be able to see reports that you have already created, add new reports and edit old ones. In this example there are a few that have already been created.

Creating a new report
- Make sure that you have the correct “Pay Frequency” set at the top of the screen. Any report that you create will only be applicable to the pay frequency that you create it in.
- After pressing “Add Report” you can select the “Report Category”. Depending on which category that you choose determines what reports will show in the box below. For example the “Employee List” report will only show when you have “Company Reports”selected.
- Next choose a “Report”. This is selecting the specific report that you want to be produced for the Global automated reports. NOTE: When printing the ‘payslip’ report the default payslip type from ‘Company Maintenance > Reports’ will be used. If emailing the ‘Boxed self seal mailer’ will be used as standard.
- Choose the “Action” for the report. Select whether you want to it be exported to a file on your computer, emailed or printed, there are several options to choose from. If you choose to email the payslips you will also need to choose a “Recipient”. Either sending to the employee, the company or both.
- Finally select whether this report will be a “Checking report” or a “Final report”. A checking report is a report that you send to your client to check if the information on it is correct prior to closing the payroll. You can then send a “Final report” when you know that the payroll is correct.
You can edit existing reports by selecting the “Edit Report” button at the bottom of the screen.

Process Reports
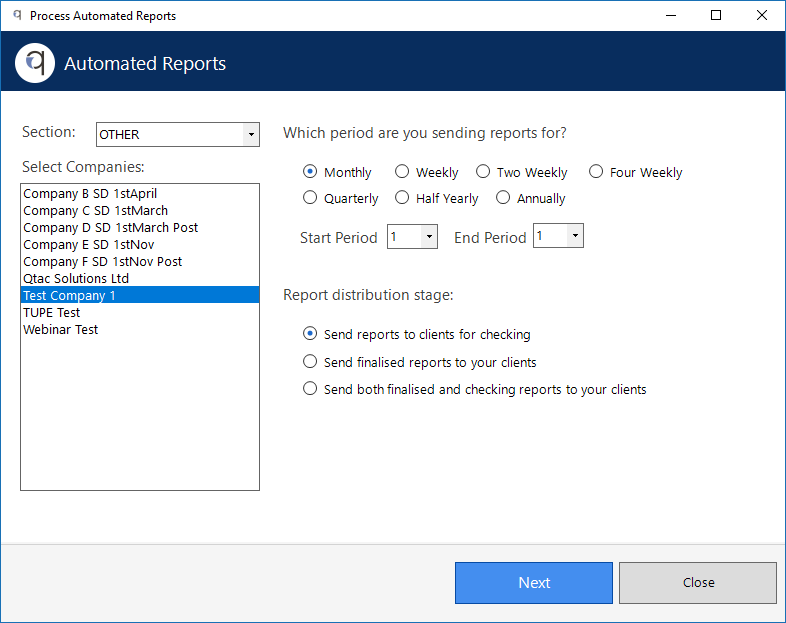
You are able to process the reports that you have created under “Global Reports > Pay Period > Automated Reports > Process Reports“. Processing reports is the act of running the reports that you have set up using the method above. Open the Process Reports page and choose the pay frequency and pay period that you wish to process for. Next select whether you want to:
- “Send reports to clients for checking” this option will run the reports you have labelled as “checking report” when created them.
- “Send finalised reports to you clients” This will process the reports labelled as “final report”
- “Send both finalised and checking reports to your clients”. This will do both of the above points.
- Press “Next” when you are happy with these settings.
- This screen displays the reports that will be run from the settings that you have selected. Simply press the “Process Reports” button and all of these reports will be run globally for your payroll.
- Emailing: If you are “Emailing” the report to employees, the software will email the report to all employees that have an email address in their “Employee Maintenance”. If emailing to the company the software will email the report(s) to the companies email as set in “Company Maintenance”.
- Export as PDF: If you select the “Export as PDF” option the software will export the files to the QTAC directory “C:\Program Files (x86)\QTAC\QTAC1920\PDF”. The software will create folders and files to keep the reports organised for you.
- Printing Reports: If you have selected the “Print Report” option the software will print that report to the default printer that is set for that report. Each reports default printer can be changed when you open the report normally and set the printer settings before you press print or print preview.

A little bit about us...
Qtac, a recognised payroll solutions provider in the UK, has been serving businesses for 30 years. Specializing in both payroll software and outsourced payroll services, Qtac caters to small businesses, large corporations, and payroll bureaux. Our software, recognised by HMRC, streamlines the payroll process, featuring RTI submissions, workplace pensions management, and a cloud-based portal for payslips and employee self-service. This software is supported by top-tier customer assistance, ensuring a smooth payroll experience.
Additionally, Qtac offers tailored ‘white-labelled’ outsourcing services. These services are particularly attractive to accountancy firms, as they save time, reduce stress, and mitigate payroll-related risks. By outsourcing to Qtac, companies can be confident in the knowledge that their payroll needs are being expertly managed.
Qtac's solutions are not just about functionality; they are about building long-lasting relationships with clients, offering them a combination of technology and expertise. Their commitment to adapting to client needs and providing reliable, efficient services has established Qtac as a trusted name in the payroll solutions sector in the UK. In essence, Qtac simplifies and enhances the payroll process for a diverse range of clients, ensuring compliance, efficiency, and customer satisfaction.
Need some help?
Contact SupportOur team are here to help...
|
|

