The software’s ‘Batch Management’ allows you to process the payroll on bulk using imported or created batch files.
The Batch management is a feature only available in the payroll specialist/bureau version of the software. In this guide we cover creating an import file, importing batch files, batch maintenance and paying employees with batch files.
Creating an Import file
The payroll software has an import function which allows external company information to be imported at any point during the tax year. This information needs to be in the form of ‘comma separated value’ files (.CSV) and arranged in a specific format.
Before you can import employee data you will first have to have a company set-up within the software. You can do this from ‘Company’ > ‘Company Maintenance’ or by importing a company batch file.
This area of the software can be found in ‘Batch Management > Create Import File’
The create import file function creates a .csv (comma separated value) file which can be edited in a spreadsheet package (Excel). The created import file automatically contains the employee name, staff number and the pay period number. Additional fields can be added by selecting the relevant check boxes in the column named ‘Other’.
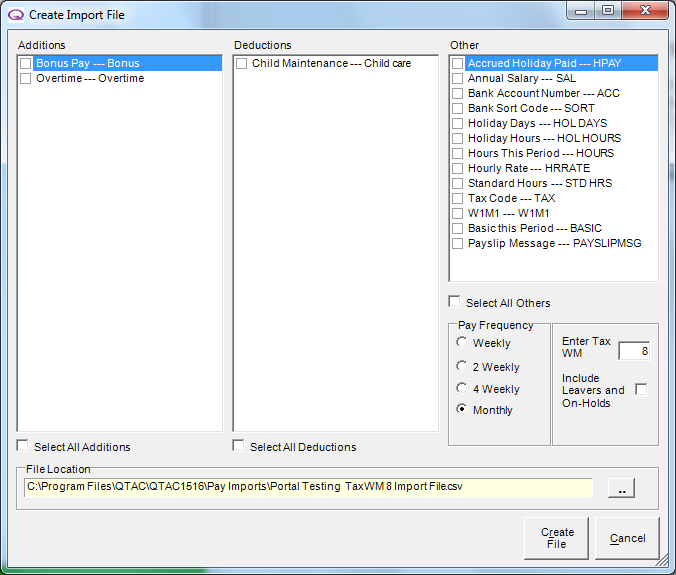
Adding Additions and Deductions
When creating a new import file you can use any additions and deductions that you already have set up in ‘Company > Additions and Deductions’ by ticking the relevant tick boxes. Before using any additions or deductions you will need to have created a short code for it. The Import uses the short code to identify the additions and deductions.
To add additions into the import file you need to tick which boxes you want to add in. There is an‘add all’ box at the bottom of each of the additions and deductions columns if you want to include them all.
Select the correct pay frequency using the radio buttons. The software will then display the pay week/month. You can manually change the pay week/month if it is incorrectly displayed in ‘Enter tax WM’.

Saving to a file location
Next you need to select where to save the import file. By default the software saves the file to the installation folder. To save to a different location click the ellipses ‘…’ button and select the new location where you want to save the file. The file name is automatically created using the file name and the pay period entered.
Once the correct file location is selected then you can click the create file button.

Paying employees with Imported Batch Files
The software contains the facility to import files that contain information on employees pay. For large payrolls this allows you to process all of your employees at the same time.
Import the pay file
To access this area of the software go to ‘Batch Management > Import’. The import section is used to import pay files. Documents that hold details of existing employees pay.
Once you have selected the file to import, click the ‘Import‘ button to bring the file into Qtac. You may see a message display saying that the employee record is locked. This happens when another user is also simultaneously using the employee record. You are able to override this lock by pressing the ‘Clear Locks‘ button.
During the import process the file will be validated. If any problems are found with the import file then the import will be aborted and an anomaly report will display detailing any errors. Amend any errors reported in the anomaly report before importing the files again.

View and Edit batch files
The ‘Batch Management > Batch Maintenance’ screen allows you to edit and delete any payment batch files that you have already imported.
- The ‘Edit’ button allows you to make changes to the batch file that you have selected. After pressing ‘Edit’ you will be presented with the ‘Batch Input’ screen. From here you can select entries to edit.
- The ‘Report’ button will show you a detailed report of what is in the batch file that you currently have selected.
- ‘Delete’ and ‘Delete All’ allow you to remove records from the batch file.
Bulk Processing
- The bulk process feature can be found in ‘Batch Management > Bulk Process’. This feature is what processes all of the imported and created batch files that have not yet already been processed. There are 3 options available to you as you bulk process.
- ‘Pay all employees who are not in the batch file’ If this option is selected then any employees who are NOT in the batch file will be paid their normal rate/salary specified in ‘Employee Maintenance > Pay Rates’
- ‘Close batch employees after they are paid’ If this is selected then all of the employees will be closed after the batch file has been processed.
- Update employee maintenance only
To process the batch click ‘Continue’. If any problems occur an anomaly report will show with details.
A little bit about us...
Qtac, a recognised payroll solutions provider in the UK, has been serving businesses for 30 years. Specializing in both payroll software and outsourced payroll services, Qtac caters to small businesses, large corporations, and payroll bureaux. Our software, recognised by HMRC, streamlines the payroll process, featuring RTI submissions, workplace pensions management, and a cloud-based portal for payslips and employee self-service. This software is supported by top-tier customer assistance, ensuring a smooth payroll experience.
Additionally, Qtac offers tailored ‘white-labelled’ outsourcing services. These services are particularly attractive to accountancy firms, as they save time, reduce stress, and mitigate payroll-related risks. By outsourcing to Qtac, companies can be confident in the knowledge that their payroll needs are being expertly managed.
Qtac's solutions are not just about functionality; they are about building long-lasting relationships with clients, offering them a combination of technology and expertise. Their commitment to adapting to client needs and providing reliable, efficient services has established Qtac as a trusted name in the payroll solutions sector in the UK. In essence, Qtac simplifies and enhances the payroll process for a diverse range of clients, ensuring compliance, efficiency, and customer satisfaction.
Need some help?
Contact SupportOur team are here to help...
|
|

