This guide will walk you through the install process of the Qtac software.
Firstly, you will need to download the software which you can find below or on the email we sent you when you purchased.
Downloading QTAC Software
Whether you are an existing or new customer you should receive an email with your pin and a link to the download of our software. You can also get to our downloads page by clicking here.
Please note: We no longer send out CD versions of the software by default. However you can contact our sales team to request a CD.
How to Install
Download and run the latest set-up file. A window should pop up automatically. You will need to select which type of install you require: ‘Standalone/Server’ or a ‘Client’ Install.
If you are unsure of what option to pick – then you most likely just need the ‘Standalone/Server‘ install, for more detail see the descriptions below. Click the ‘Install’ button to begin. The installation wizard contains full instructions on the install process.
After running the install the software should automatically start the install of SAP Crystal Reports, this will load through and move onto the Install Wizard.

Install Wizard (step-by-step):
Install Wizard Welcome - The Installer will now welcome you to the install wizard, from here you need to read what it says on screen and click ‘Next’ where appropriate.
License agreement - The next page is the agreement of our Terms and Conditions, you need to tick the box ‘I accept the license agreement’ before you can continue. Our license agreement can also be found here.
Destination Folder - The Installer should automatically select the default destination folder so this shouldn’t need any changing before continuing.
SQL Server Connection - The Install should also automatically select the ‘SQL Server Name’ & ‘Database Authentication’.
Install Complete - The install of the software is now complete and you can now launch the program from the shortcut on your desktop.

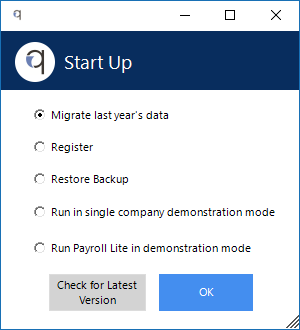
Start Up Wizard:
The Start Up window will ask what you would like to do when you open the software for the first time:
- Migrate Last Year’s Data-If you have last year’s software installed with employee data you can transfer this though the migration process, further instructions can be found here.
- Register-If you have purchased the product and need to start with no data in the software you should choose this option.
- Restore Backup-If you already have a Backup from the software and want to restore it into this install, choose this option and further instructions can be found here.
- Run in single company demonstration mode-If you are looking to run the Free-45 day trial then choose this option.
Install Descriptions
Standalone/server: Installs the main application and prerequisites locally on the computer you are using. Can be used for single PCs/laptops or installing on to your main application server.
Client: To install the necessary prerequisites on a client computer. The ‘Standalone/Server‘ should be run on the server first, and then the client install should be run on any machines that will be using QTAC. Client machines are then pointed at the shared server location.
Client Computer changes for 19/20
For the QTAC 19/20 payroll software all computers must be running .Net Framework 4.5+. A new version of Crystal reports is also required and will need to be installed on each client machine. Our full install will do this automatically however you can download the crystal reports upgrade by clicking here.
A little bit about us...
Qtac, a recognised payroll solutions provider in the UK, has been serving businesses for 30 years. Specializing in both payroll software and outsourced payroll services, Qtac caters to small businesses, large corporations, and payroll bureaux. Our software, recognised by HMRC, streamlines the payroll process, featuring RTI submissions, workplace pensions management, and a cloud-based portal for payslips and employee self-service. This software is supported by top-tier customer assistance, ensuring a smooth payroll experience.
Additionally, Qtac offers tailored ‘white-labelled’ outsourcing services. These services are particularly attractive to accountancy firms, as they save time, reduce stress, and mitigate payroll-related risks. By outsourcing to Qtac, companies can be confident in the knowledge that their payroll needs are being expertly managed.
Qtac's solutions are not just about functionality; they are about building long-lasting relationships with clients, offering them a combination of technology and expertise. Their commitment to adapting to client needs and providing reliable, efficient services has established Qtac as a trusted name in the payroll solutions sector in the UK. In essence, Qtac simplifies and enhances the payroll process for a diverse range of clients, ensuring compliance, efficiency, and customer satisfaction.
Need some help?
Contact SupportOur team are here to help...
|
|

